
Spider Web Woman Designs
Formatting Fields in an ASP.NET Gridview with Microsoft Expression Web 4
In Expression Web 4, it’s a fairly simple process to display data from a database on a web page in a gridview (table). However, without formatting the fields, it’s difficult to distinguish one data field from another, and impossible to click on a link or email address. This article shows you how to format number fields (currency and percentages) and telephone numbers, and make URLs and email addresses clickable in an ASP.Net Gridview using Expression Web 4. Figure 1 shows you a gridview with no fields formatted.
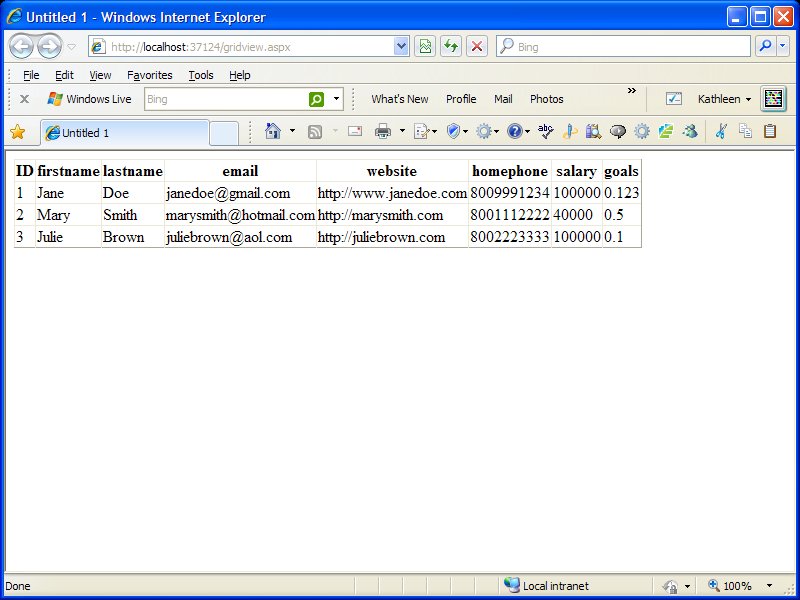
Figure 1: An ASP.NET Gridview with unformatted fields
Getting Started
This article assumes that you have created a website, imported an Access database into it, configured your data source using the AccessDataSource Control, created a Gridview on a web page, and saved the page with an .aspx file extension.
The instructions in this tutorial were created using:
- Expression Web 4
- Microsoft Access 2003
- Microsoft Expression Development Server
- Microsoft .NET Framework 4.0.
- Windows XP Pro SP3
Making a URL Clickable in an ASP.NET GridView
In Design View, click in the GridView and click on the arrow pointing to the right. You should see the GridView Tasks pop-up (see Figure 2).

Figure 2: Gridview Tasks pop-up
Then, follow these steps:
- Choose Add New Column; this should bring up the Add Field
dialog (see Figure 3).
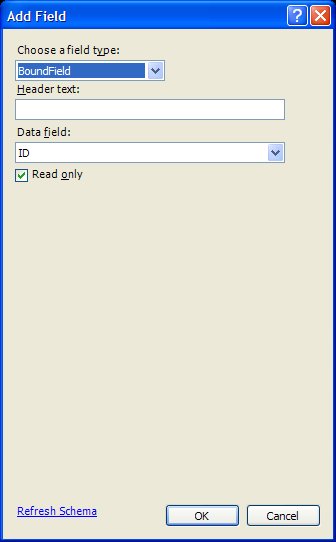
Figure 3: Add Field dialog
- Choose HyperLinkField as the field type (see Figure 4). This
will open up more fields to use with dropdowns to select
data fields from your database.

Figure 4: Choose HyperLinkField and more options will appear
- Type the text you want to appear as your column header in the
Header Text field.
For Hyperlink Text, if you want generic text to appear, type it into the Specify Text field. If you want the URL to display, choose Get Text from Data Field and select your fieldname from the dropdown. You can also customize the text using another field in your database and formatting it. The example in Figure 4 is using the firstname field as part of the Hyperlink Text.
For Hyperlink URL, choose Get URL from Data Field and select your field from the dropdown.
If the URL in your database in formatted as www.yourwebsite.com (without a preceding http://), type http://{0} in the URL format string box (see Figure 5).
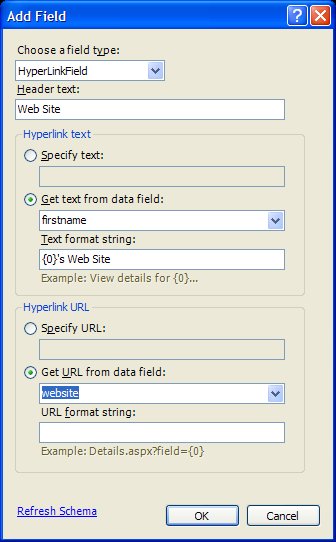
Figure 5: Use http://{0} if the URL field in your database does not include http://.
- Click OK.
- Save your page and preview in the browser.
Opening the Hyperlink in a New Window
In Design View, click on the column and click on the arrow pointing to the right to bring up the GridView Tasks pop-up. Then:
- Choose Edit Columns.
- Find your field in the Selected Fields list.
- In the HyperLinkField properties, scroll down to Target and choose _blank from the dropdown.
- Click OK.
- Save your page and preview in browser (see Figure 6).
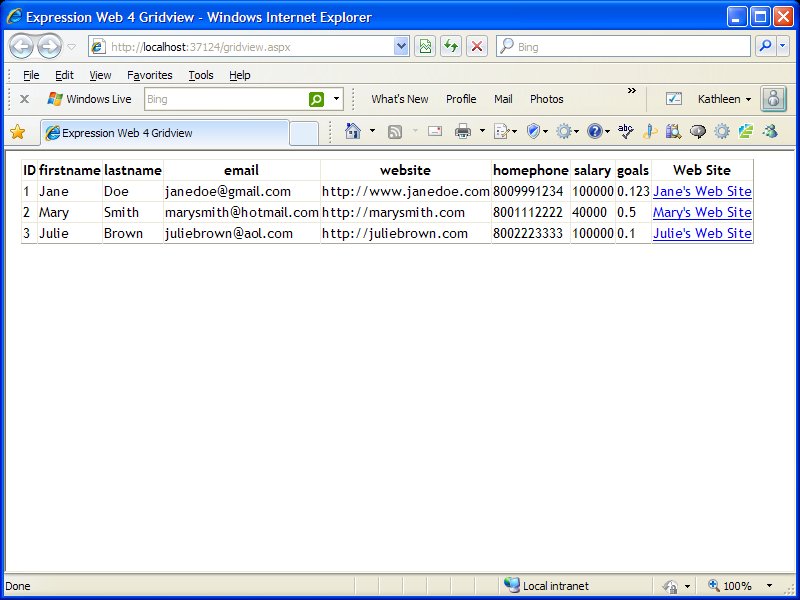
Figure 6: Your ASP.NET Gridview as it will appear in a browser. Click the Web Site link and a new browser window will open.
Notice that the Website field from your database is displaying twice? In Design View, click on the Gridview and click on the arrow pointing to the right to bring up the GridView Tasks pop-up. Choose Edit Columns, find the original Website field in the Selected Fields list, and click the red ‘X’ to delete it.
- Click OK.
- Save the page and preview in the browser.
Making an Email Address Clickable in an ASP.NET GridView
In Design View, click on the Gridview and click on the arrow pointing to the right to bring up the GridView Tasks pop-up. Then:
- Choose Add New Column. This should bring up the Add Field dialog.
- Select HyperLinkField as the field type.
- Type the text you want to appear as your column header in the
Header Text field.
For Hyperlink text, choose Get text from data field and select your email address fieldname from the dropdown.
For Hyperlink URL, choose Get URL from data field and select your field from the dropdown.
In the URL format string field, type mailto:{0}.
- Click OK.
- In Design View, click on the column you just added and then click on the arrow pointing to the right to bring up the GridView Tasks pop-up.
- Choose Edit Columns.
- Find your field in the Selected fields list and select it.
- Click the Convert This Field into a TemplateField link.
- Click OK. In Design View, the field should be displayed as a clickable field called Databound.
- Save your page and preview in the browser. The email addresses in the new column are now clickable.
You can delete the extra non-clickable email field by following the instructions at the end of the previous section.
Formatting Number Fields in an ASP.NET GridView
In Figure 1, we saw fields identified as telephone numbers, salaries, etc. that really didn’t look all that clear. In this section, you learn how to format those fields to make them more usable for your site visitors.
Format a Field as Currency
In Design View, click on the Gridview and click on the arrow pointing to the right to bring up the GridView Tasks pop-up. Then:
- Choose Edit Columns.
- Select the number from the Selected fields list.
- Under BoundField > Behavior properties, set HtmlEncode to False.
- Under BoundField > Data Properties, setDataFormatString to {0:C2}. (The C means Currency, and the 2 represents the number of positions after the decimal point.)
- Click OK and preview in browser.
This is what the code looks like:
<asp:boundfield HtmlEncode="False" DataFormatString="{0:C2}" DataField="salary"
 SortExpression="salary" HeaderText="salary"> </asp:boundfield>
Format a Field as a Percent
The field in the Access database was defined as:
- Field Size: Single
- Format: Percent
- Decimals Places: Auto
In Design View, click on the Gridview and click on the arrow pointing to the right to bring up the GridView Tasks pop-up. Then:
- Choose Edit Columns.
- Select the percent field from the Selected fields list.
- Under BoundField > Behavior properties, set HtmlEncode to False.
- Under BoundField > Data Properties, setDataFormatString to {0:P2}. (The P means Percent, and the 2 represents the number of positions after the decimal point.)
- Click OK.
This is what the code looks like:
<asp:boundfield HtmlEncode="False" DataFormatString="{0:P2}" DataField="amount"
 SortExpression="amount" HeaderText="amount"> </asp:boundfield>
Formatting a Telephone Number Field in an ASP.NET GridView
This option can work if your telephone number is stored in a Text field in your Access Database. In this example, my field name is "homephone".
In Design View, click on the Gridview and click on the arrow pointing to the right to bring up the GridView Tasks pop-up. Then:
- Choose Edit Columns.
- Select the field containing the phone number from the Selected Fields list.
- Click the Convert this field into a TemplateField link.
- Click OK.
- Switch to Code View.
- Find the generated code for the phone number field:
<asp:templatefield SortExpression="homephone" HeaderText="homephone"> <EditItemTemplate> <asp:TextBox runat="server" Text='<%# Bind("homephone") %>' id="TextBox1"> </asp:TextBox> </EditItemTemplate> <ItemTemplate> <asp:Label runat="server" Text='<%# Bind("homephone") %>' id="Label1"> </asp:Label> </ItemTemplate> </asp:templatefield> -
In the ItemTemplate node (highlighted above in blue), select the
code highlighted in yellow and replace it with this code:
<%# String.Format("{0:(###) ###-####}",Convert.ToInt64(DataBinder.Eval (Container.DataItem, "homephone")))%> - Save your page and preview in browser.
If you follow the instructions in this article, your web page will go from what we saw in Figure 1 to what we see now in Figure 7. I’m sure you (and your users) will agree that this is a definite improvement.
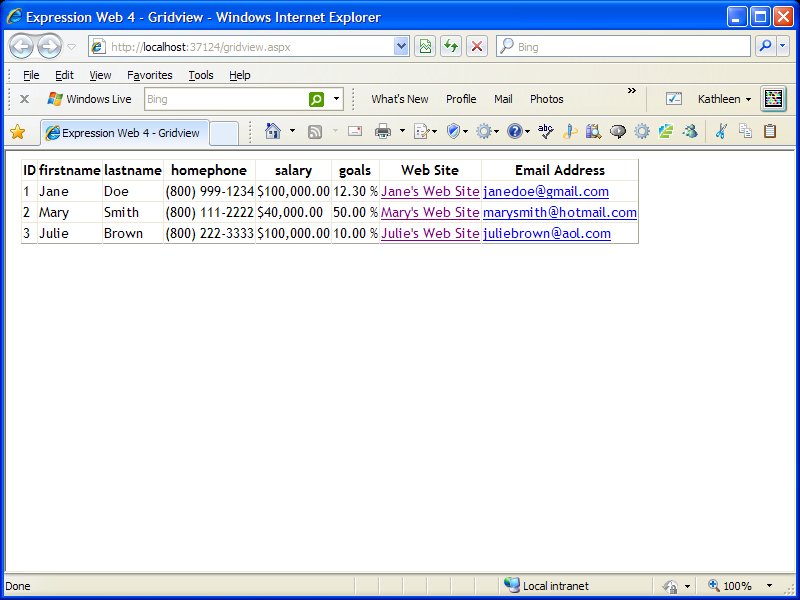
Figure 7: Your ASP.NET Gridview with formatted URL, email, and number fields.
This article was orginally written for Que Publishing and published as Formatting Fields in an ASP.NET Gridview with Microsoft Expression Web 4 .


